Showing posts with label excel. Show all posts
Showing posts with label excel. Show all posts
Tuesday, February 26, 2013
LibreOffice Calc: Toggles between relative, mixed and absolute referencing
F4 function key in Microsoft Excel toggles between relative, mixed and absolute referencing.
In LibreOffice Calc, use Shift+F4 to perform the same task.
Sunday, October 30, 2011
Move Between Excel Worksheets
To move between Excel worksheet in the same Excel document, the keyboard commands are "CTRL+Page Up" and "CTRL+Page Down".
Monday, June 29, 2009
How to display an equal sign in Excel
The equal sign is a special sign used to indicates that we are typing a formula in a cell. It will never be shown in a cell. But, is it possible to display the equal sign in Microsoft Excel?
Actually you can display the equal sign. What you need to do is just add an apostrophe in front of the equal sign, like this:
Once you press Enter, the apostrophe will disappear, leaving the equal sign.
Note: To display the apostrophe, just enter the apostrophe twice.
Actually you can display the equal sign. What you need to do is just add an apostrophe in front of the equal sign, like this:
'=Once you press Enter, the apostrophe will disappear, leaving the equal sign.
Note: To display the apostrophe, just enter the apostrophe twice.
Thursday, March 19, 2009
Create PDF with Microsoft Office 2007
If you are a user of Microsoft Office 2007, there is a free add-in provided by Microsoft to publish your documents as PDF. Besides, it also allows you to send files as e-mail attachments in the PDF format.
This add-in will works with the following office programs:
To produce PDF, select Save to PDF from the Office or File menu.
The free add-in can be downloaded from here (SaveAsPDF.exe).
This add-in will works with the following office programs:
- Microsoft Office Access 2007
- Microsoft Office Excel 2007
- Microsoft Office InfoPath 2007
- Microsoft Office OneNote 2007
- Microsoft Office PowerPoint 2007
- Microsoft Office Publisher 2007
- Microsoft Office Visio 2007
- Microsoft Office Word 2007
To produce PDF, select Save to PDF from the Office or File menu.
The free add-in can be downloaded from here (SaveAsPDF.exe).
Labels:
E-book
,
excel
,
InfoPath
,
Microsoft Office 2007
,
Office Tips
,
OneNote
,
pdf
,
powerpoint
,
Publisher
,
Visio
,
word
Friday, January 9, 2009
Monitor your income with a spreadsheet
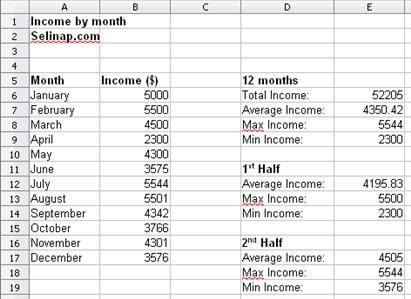
This tutorial is about creating a simple spreadsheet to monitor monthly income. The spreadsheet will contains income by month, and total, average, max, and min income for the whole year. Besides, the spreadsheet will also provides the average, max and min income for the 1st and second half of the year.
Here are the steps:
The final product should more or less, look like the picture below.

Please note that the spreadsheet used in this tutorial is OpenOffice Calc. However, the same formulas will also work in Microsoft Excel.
Here are the steps:
- Calculate total income.
Click on cell E6. Type "=SUM(" without the quotes. Do not close the bracket yet. Select cells B6 to B17. Close the bracket. Press Enter.
- Calculate average income.
Repeat the same procedure as in step 1, but now use "AVERAGE" instead of "SUM".
- Calculate max income.
Repeat the same procedure as in step 1, but now use "MAX" instead of "SUM".
- Calculate min income.
Repeat the same procedure as in step 1, but now use "MIN" instead of "SUM".
- Calculate average income for the 1st half of the year.
Repeat the same procedure as in step 1, but only select 6 rows of cells (B6 to B11), since we need to calculate the average of income for 6 months.
- Calculate max income for the 1st half of the year.

- Calculate min income for the 1st half of the year.

- Repeat step 5, 6 and 7 for average, max and min income for the 2nd half of the year, by selecting the rows for month July to December.
The final product should more or less, look like the picture below.

Please note that the spreadsheet used in this tutorial is OpenOffice Calc. However, the same formulas will also work in Microsoft Excel.
Friday, August 29, 2008
Custom Excel Dates
Microsoft Excel provides a way to create our own date format.
The date format could be customize using these codes.
Date codes:
Month codes:
Year codes:
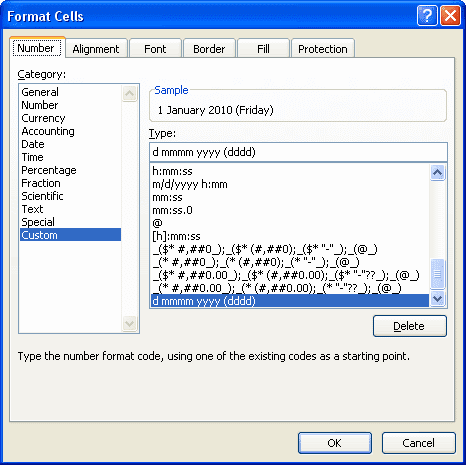
To use the custom format for a cell:

Note:
If the cell already contains a data. The preview box, located above the Type field, will try to provides the sample of the codes output.
The date format could be customize using these codes.
Date codes:
- d - the day number (1, 2, 3, ..., 31)
- dd - the day number in two digits (01, 02, 03, ..., 31)
- ddd - the abbreviated day (Mon, Tue, ..., Sun)
- dddd - the day of the week (Monday, Tuesday, ... Sunday)
Month codes:
- m - the month number (1, 2, 3, ..., 12)
- mm - the month in two digits (01, 02, 03, ..., 12)
- mmm - the abbreviated month (Jan, Feb, ..., Dec)
- mmmm - the month of the year (January, February, ..., December)
- mmmmm - the first letter of the month (J, F, ..., D)
Year codes:
- yy - the year in two digits (e.g. 08, 09)
- yyy -the year as four digits (e.g. 2008)
To use the custom format for a cell:

- Click on the cell, and choose Format Cells... on the right click menu.
Hint: the keyboard shortcut is ctrl+1. - In the Format Cells dialogue window, select the Number tab.
- In the Category pane on the left, choose Custom.
- Look right for the Type field.
- Enter the desired custom dates codes here.
Note:
If the cell already contains a data. The preview box, located above the Type field, will try to provides the sample of the codes output.
Tuesday, May 6, 2008
Create LaTeX table easily
LaTeX is a great typesetting system that produces publication quality mathematics, and it is free. However, creating table in LaTeX is not an easy task.
Fortunately, there are some table generator exists for creating LaTeX table. One example is Excel2LaTeX. Excel2LaTeX is a free Microsoft Excel addin that allows you to transform the Microsoft Excel current selection into LaTeX code. Most of the formatting such as bold, italic, border lines, and multi column cells, will be preserved.
The usage is very simple. First, create the table using Microsoft Excel. Second, highlight the table. Finally, click on the Excel2LaTeX addin button on the toolbar. The LaTeX code can then be copied to the clipboard, or saved as a LaTeX file.
As a conclusion, creating table in LaTeX is not an easy task. However, the existence of LaTeX table generator such as Excel2LaTeX, will ease the problem.
Download link: Excel2LaTeX
Fortunately, there are some table generator exists for creating LaTeX table. One example is Excel2LaTeX. Excel2LaTeX is a free Microsoft Excel addin that allows you to transform the Microsoft Excel current selection into LaTeX code. Most of the formatting such as bold, italic, border lines, and multi column cells, will be preserved.
As a conclusion, creating table in LaTeX is not an easy task. However, the existence of LaTeX table generator such as Excel2LaTeX, will ease the problem.
Download link: Excel2LaTeX
Monday, April 28, 2008
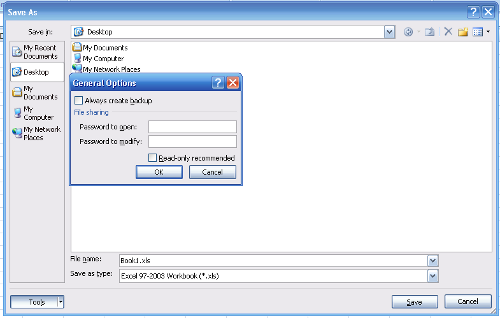
Password protect Excel 2007
Tuesday, April 22, 2008
Insert figures to LaTeX
LaTeX is a good tool for creating articles or books. However, when it comes to inserting figures, it is a very cumbersome process. This tutorial will show the steps for producing LaTeX documents with figures. For the purpose of this tutorial, we will use a graph from an excel document.
Step 1: Highlight (left click) the graph in the excel file.
Step 2: Copy the graph into memory. Right click and select Copy. (or just press and hold Ctrl, and then press c)

Step 3: Open Paint application. Click on the Start button, choose All Programs > Accessories > Paint.

Step 4: Paste the graph that we have just copied into Paint. Click on Edit > Paste. (or just press and hold Ctrl, and then press v)


Step 5: Now we are going to save our graph in JPEG format. Click File > Save As. A "Save As" dialog box will opened. Type the file name - graph. For the "Save as type" choose JPEG. For simplicity, make sure that the graph is saved in the save folder as the LaTeX document. Then, click on the save button.


Step 6: Open the LaTeX document, and type the following LaTeX code:
\begin{figure}[htp]
\centering
\includegraphics{graph}
\caption{Some graph}
\label{fig:graph}
\end{figure}
Don't forget to import the graphicx package, by inserting
\centering
\includegraphics{graph}
\caption{Some graph}
\label{fig:graph}
\end{figure}
\usepackage{graphicx}
at the top of the LaTeX document.Step 7: Now we can produce the pdf document, using the pdflatex command.
note: This tutorial assumed that we are going to produce a pdf file, since pdflatex only accept PDF, PNG, JPEG and GIF format. For producing a postscript or dvi file, we need to convert the JPEG file (graph.jpg) to eps format. It could be done using tools such as jpeg2ps. However, it is beyond this tutorial.
Wednesday, April 16, 2008
View Microsoft Office 2007 Files
To view or print a Microsoft Office 2007 file, on a PC without Microsoft Office 2007, just download the viewer from Microsoft. The viewer will allow you to view and print those files, and can even open password protected Word, Excel or PowerPoint files. However, you cannot edit those files.
Here are the download links:
Word Viewer 2007
Excel Viewer 2007
PowerPoint Viewer 2007
Here are the download links:
Word Viewer 2007
Excel Viewer 2007
PowerPoint Viewer 2007
Labels:
excel
,
Microsoft
,
Office 2007
,
Office Tips
,
powerpoint
,
viewer
,
Windows
,
Windows XP
,
word
Subscribe to:
Comments
(
Atom
)


