Showing posts with label Windows XP. Show all posts

Tuesday, February 16, 2010

Windows XP: How to create a password for the invisible administratoraccount

Windows XP create an administrator account by default which is invisible. This administrator account is not password protected. How to protect this account with a password?

Steps to password protect the administrator account.

Step 1.
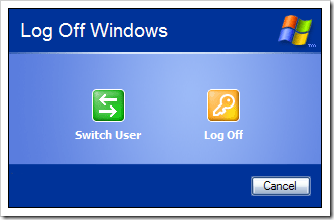
If you are currently logged on to your computer, click Start, and then click Log Off.


Step 2.
On the “Welcome screen”, press CTRL+ALT+DEL twice on your keyboard by holding down both the CTRL and ALT keys and then pressing DELETE.

Step 3.
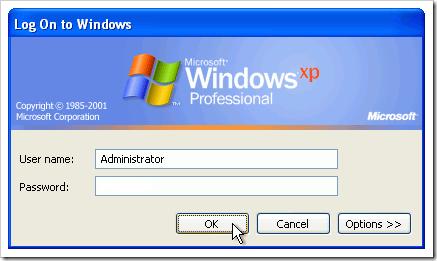
The “Log On to Windows” dialog box appears. In the “User name” box, type “Administrator”. Leave the “Password” box blank if you have not assigned a password. Click OK.


Step 4.

Open the entry “User Accounts” in the control panel. Click on the icon “Administrator” and select “Create a password”.

Step 5.

In the following dialog, specify a password for the “Administrator” account. Click “Create Password”.


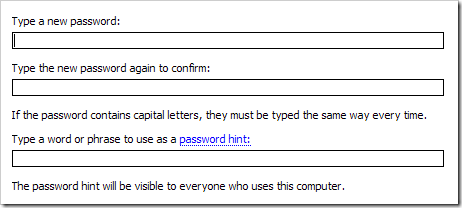
It is important to create a strong but easily memorable password. A strong password should includes a combination of letters (small and capitals), numbers and special characters, and at least eight characters long.

Saturday, May 30, 2009

How to displays a list of applications currently running in Windows XP

In Windows XP, tasklist command line tool displays a list of applications and associated tasks/processes currently running on either a local or remote system.

Examples of usage:

  1. Lists all tasks that have DLL modules loaded in them that match the given pattern name. If the module name is not specified, displays all modules loaded by each task.
    TASKLIST /M
    Tasks under module that match wbem* such as wbemcomn.dll.
    TASKLIST /M wbem*

  2. Specifies that the verbose information is to be displayed.
    TASKLIST /V

  3. Displays services in each process.
    TASKLIST /SVC

Saturday, May 16, 2009

Disable "Desktop Cleanup Wizard" in Windows XP

How to disable "Desktop Cleanup Wizard" in Windows XP.
  1. Right click on the desktop, and choose Properties.
  2. Click "Customize Desktop" button on the "Desktop" tab.
  3. Under the General tab, uncheck "Run Desktop Cleanup Wizard every 60 days" selection, in the "Desktop cleanup" section. Click OK.

Saturday, May 9, 2009

Change the function of the power button

What can the power button does instead of to switch on the computer. By default, it will usually bring the computer to stand by mode.

However, you can actually change the function of the power button.

To change the function of the power button.
  1. Click on Start > Run. Type Powercfg.cpl. Click OK.

  2. Click on the Advance tab.

  3. In the Power buttons region, under "When I press the power button on my computer" option, click the drop down menu to choose the available functions. Usually, you will see Do nothing, Ask me what to do, Standby, Hibernate and Shut down.

Thursday, March 19, 2009

Disable Windows XP Splash Screen

System Properties
To disable the splash screen in Windows XP:
  1. Right-click My Computer and choose Properties. (or, press Windows key+Pause key)
  2. Click the Advanced tab, and click the Settings button under Startup and Recovery.
  3. In the System Startup area, click Edit.
  4. After the /fastdetect entry under [operating systems], add a space and /SOS.
    [boot loader]
    timeout=30
    default=multi(0)disk(0)rdisk(0)partition(1)WINDOWS
    [operating systems]
    multi(0)disk(0)rdisk(0)partition(1)WINDOWS="Microsoft Windows XP Professional" 
     /fastdetect /SOS
  5. Click File | Save. Click OK to apply and close the System Properties dialog box.
  6. Restart the computer and the splash screen will be gone.

Wednesday, March 18, 2009

Enable autologon to increase bootup performance

To enable autologon and bypass XP’s prompt to enter a username and password, perform the following steps:
  1. Click Start | Run.
  2. In the Run dialog box, type "control userpasswords2" and click OK, without the quotation marks.
  3. Uncheck Users Must Enter A User Name And Password To Use This Computer and click OK.
  4. In the Automatically Log On dialog box that appears, type your username and password, confirm the password, and click OK.
User Accounts Management

Tuesday, March 17, 2009

Prohibit unnecessary programs from starting with Windows

Reducing the number of programs that start with Windows will make the boot up process noticeably faster and lightening the load on the CPU. To view and remove programs that start with Windows, perform the following steps:
  1. Click Start | Run.
  2. In the Run dialog box, type msconfig.exe and click OK.
  3. In the System Configuration Utility dialog box, choose the Startup tab.
  4. Uncheck any item you do not want to start up when Windows boots.
The System Configuration Utility

Wednesday, January 14, 2009

Disable Windows splash screen

To see the details of the bootup process, we need to disable the splash screen. The splash screen hides the information during the computer boots, such as Windows XP version, files being loaded, system data, and file system check.

To disable the splash screen in Windows XP:

  1. Right-click My Computer and choose Properties.
  2. Click the Advanced tab, and click the Settings button under Startup
    and Recovery.
  3. In the System Startup area, click Edit.
  4. Click File | Save. Click OK to apply and close the System Properties
    dialog box.
  5. Restart the computer to see the changes.

Tuesday, January 13, 2009

Enable Windows autologon

This tip is useful for a single user computer. Windows will bypass the Welcome screen, and automatically log a user in.

The Steps:

  1. Click Start | Run. Another alternative is to press and hold the Win key, and then press R.
  2. Uncheck "Users Must Enter A User Name And Password To Use This Computer" and click OK.
  3. In the Automatically Log On dialog box that appears, type the username and password, confirm the password, and click OK.

Sunday, October 12, 2008

Disable Error Reporting Notification in Windows XP

When a severe error occurs in a program, Windows XP will usually halt the program, and then Windows XP ask whether you want to send the error messages to Microsoft. However, you can actually disable this annoying features.

To disable this feature:
  1. Bring up the System Properties dialog box. (In case you don't know how to display the dialog box, please refer to How to display the System Properties dialog box)
  2. Click on Advance tab.
  3. Click on Error Reporting.
  4. Click on Disable error reporting.

Saturday, October 11, 2008

2 Ways to Display the Windows System Properties Dialog Box

There are multiple ways to display the Windows System Properties dialog box.
Here are some of the ways:
  1. Click on Start -> Right Click on My Computer -> Click Properties.
  2. On the keyboard, press and hold the Windows key (usually located besides the Alt key, which is usually located besides the long Space Bar key). Then, while holding the Windows key, press the Break key (or, the Pause key). Those keys usually located on the top right of the keyboard.
note: Some notebook may require you to press and hold the Fn key in order to access the Pause or Break key.

Sunday, August 3, 2008

Drag file to print

This is a quick way to print a file without opening it yourself. What you need is a shortcut to the printer icon on your desktop. In order to print a file, just drag the file to the printer icon, and get your print.

To create a shortcut to the printer icon on your desktop,

  1. Click on Start button > Printer and Faxes

  2. Drag the default printer icon to the desktop


note: If you create a none default printer on the desktop, Windows will ask you to make it as default, the first time you drag a file onto it. You have to click on Yes, in order to use this feature.

Sunday, May 18, 2008

Give me C: drive

This is one of the quick way to explore the C: drive.
  1. Press the Windows Key (usually it is located besides the the Alt key) altogether with the letter R.
  2. Type in the forward slash "".
  3. Hit the Enter key. It will open the explorer window with the C drive opened.

Note: For Windows 98 or ME, use the backslash "/". You can also type in the drive letter such as "C:" or "D:". Just don't forget the colon ":".

Sunday, May 11, 2008

Windows XP Service Pack 3 Final release download


Microsoft had finally released the final version of its Windows XP Service Pack 3. According to Microsoft, this update includes a small number of new functionalities, which do not significantly change customers’ experience with the operating system.

Windows XP SP3 ensures these PCs have all available updates and allows these PCs to leverage some new Windows Server 2008 capabilities, such as Network Access Protection (NAP). Although Windows XP SP3 does not include Windows Internet Explorer 7, Windows XP SP3 does include updates to both Internet Explorer 6 and Internet Explorer 7. It will update whichever IE version is installed on the computer.

As a conclusion, Windows XP SP3 combines all previously released performance, security, and stability updates. It also provides a limited number of new and enhanced functionalities, although it does not significantly change the Windows XP experience or bring functionality from newer versions of Windows to Windows XP.

Download Here

Tuesday, April 29, 2008

Password protect PowerPoint 2007

This tutorial is about how to protect PowerPoint 2007 with a password.

To password protect a Microsoft PowerPoint 2007 file,

  1. Click on the Microsoft Office Button.

  2. Click Save As.

  3. Click Tools.

  4. Click General Options.

  5. Enter the password to open or modify (one or both).

  6. Click OK.

  7. When prompted, retype your passwords to confirm them, and click OK.

  8. Click Save.


Password protect PowerPoint 2007

Monday, April 28, 2008

Password protect Excel 2007


To password protect a Microsoft Excel 2007 file,
  1. Click on the Microsoft Office Button.
  2. Click Save As.
  3. Click Tools.
  4. Click General Options.
  5. Enter the password to open or modify (one or both).
  6. Click OK.
  7. When prompted, retype your passwords to confirm them, and click OK.
  8. Click Save.

Open a Word 2007 document in an earlier version of Word

In the previous article, I have shown you how to open a Word 2007 document without having to install Microsoft Office 2007.

However, If you are running Windows 2000 with Service Pack 4, or Windows Server 2003, or Windows Vista, or Windows XP with Service Pack 1, and already have Microsoft Word 2000 with Service Pack 3, or Microsoft Word 2002 with Service Pack 3, or Microsoft Office Word 2003 with at least Service Pack 1, or Microsoft Office Word Viewer 2003, installed, you don't need the Word 2007 viewer. Fortunately, Microsoft had released the "Microsoft Office Compatibility Pack for Word file format", in November 19, 2007.

This pack will enable Microsoft Office 2000, Office XP, or Office 2003, to open, edit, and save Word files using the Word 2007 file format, although you may not be able to change some items that were created by using the new or enhanced features in Word 2007.

For examples, equations will become graphics, themes will be converted to styles, bibliography and citations will be converted to static text, and some charts and diagrams will converted to images. The changes are permanent (unless you didn't save the document).

Download here:
Microsoft Office Compatibility Pack for Word 2007

Sunday, April 27, 2008

Disable Windows Autorun

This tip is useful for disabling Windows XP from running the Autorun.inf file.
REGEDIT4
[HKEY_LOCAL_MACHINESOFTWAREMicrosoftWindows
NTCurrentVersionIniFileMappingAutorun.inf]
@="@SYS:DoesNotExist"
For further information, please go to

Nick Brown's blog

Wednesday, April 16, 2008

View Microsoft Office 2007 Files

To view or print a Microsoft Office 2007 file, on a PC without Microsoft Office 2007, just download the viewer from Microsoft. The viewer will allow you to view and print those files, and can even open password protected Word, Excel or PowerPoint files. However, you cannot edit those files.

Here are the download links:

Word Viewer 2007
Excel Viewer 2007
PowerPoint Viewer 2007

Password protect Word 2007

This is a simple technique on how to protect a Microsoft Word 2007 file with a password.

To password protect a Microsoft Word 2007 file,

  1. Click on the Microsoft Office Button.

  2. Click Save As.

  3. Click Tools.

  4. Click General Options.

  5. Enter the password to open or modify (one or both).

  6. Click OK.

  7. When prompted, retype your passwords to confirm them, and click OK.

  8. Click Save.


Password protect Word 2007